From my original CodeProject article in 2009. Fixed some formatting to improve readability. Sadly, CodeProject shutdown in 2024.
Download the source code from the CodeProject article

Introduction
While using my Galaxy Tab running Android 3.2 Honeycomb, I like the small notification/status dialog that appears at the bottom of the screen. Since I am currently experimenting with .NET on how to create custom user-painted controls, I tried doing this so I can use it on my future software developments.
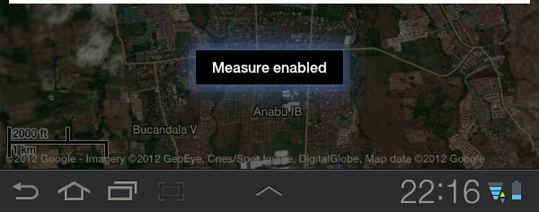
A sample Android status dialog, known as Toast Notification:
Under the Hood
To better understand what's happening, follow the source code included in this article.
The codes are written in a static class or module so we don't need to create instances of it, much similar to MessageBox class of .NET.
This is the class diagram of our NotificationManager module.
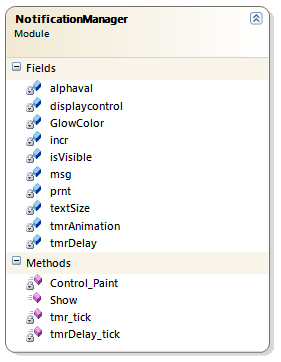
| Member | Description |
|---|---|
alphaval | The variable that holds the opacity value of the notification window. (0 - 1) |
displaycontrol | The control where we will paint the contents. |
GlowColor | The color of the borders of the notification window. |
incr | The increment value for the alpha value. Fade in has positive value while Fade out has negative value. |
isVisible | A switch that determines if the notification is currently visible/shown. |
msg | The variable that holds the message to be displayed. |
prnt | The parent object/control of the notification window. |
textSize | The measured size of the message. |
tmrAnimation | A timer object that fades in/out our notification window. |
tmrDelay | A timer object that hides the notification after the specified delay. |
| Public Method | Description |
|---|---|
Show(ByRef Parent As Control, ByVal Message As String, ByVal glw As Color, ByVal delay As Integer) | This shows the notification dialog. Positioned at the center bottom of the indicated parent control. It is recommended that you set your Form object as the parent of this component. |
The Control
The custom dialog I have created displays inside a container control - it means it is not a top-level control like a window or dialog boxes. This will hold the contents that will be displayed to the user.
Checking on the properties of a normal WinForms control, setting its BackColor property value to Transparent will make it blend with its parent's BackColor and BackgroundImage, but will not make underlying controls visible. To solve this problem, besides making its BackColor transparent, we should also paint all controls underneath it to make it look really transparent.
On the attached source code, see the ExtendedControl class. This class inherits the Control class of the .NET Framework.
The ExtendedControl PaintBackground event override to make it transparent:
'Override the default paint background event.
'Append here the true transparency effect.
Protected Overrides Sub OnPaintBackground(ByVal e As System.Windows.Forms.PaintEventArgs)
    MyBase.OnPaintBackground(e)
    If (IsTransparent) Then
        If Not (Parent Is Nothing) Then
            Dim myIndex As Integer = Parent.Controls.GetChildIndex(Me)
            For i As Integer = Parent.Controls.Count - 1 To myIndex + 1 Step -1
                Dim ctrl As Control = Parent.Controls(i)
                If (ctrl.Bounds.IntersectsWith(Bounds)) Then
                    If (ctrl.Visible) Then
                        Dim bmp As Bitmap = New Bitmap(ctrl.Width, ctrl.Height)
                        ctrl.DrawToBitmap(bmp, ctrl.ClientRectangle)
                        e.Graphics.TranslateTransform(ctrl.Left - Left, ctrl.Top - Top)
                        e.Graphics.DrawImage(bmp, Point.Empty)
                        e.Graphics.TranslateTransform(Left - ctrl.Left, Top - ctrl.Top)
                        bmp.Dispose()
                    End If
                End If
            Next
        End If
    End If
End Sub
Positioning the Dialog Control
The position of the dialog control will be at the center of the bottom part of the parent control. The width of the dialog control should not go beyond the visible area of the parent control. The size of the control is also relative to the measure of the string/message using Graphics.MeasureString.
The code below centers the dialog control, as well as adjust its height and width:
'Set the control dimensions.
textSize = displaycontrol.CreateGraphics().MeasureString(Message, Parent.Font)

displaycontrol.Height = 25 + textSize.Height
displaycontrol.Width = 35 + textSize.Width

If (textSize.Width > Parent.Width - 100) Then
     displaycontrol.Width = Parent.Width - 100
     Dim hf As Integer = CInt(textSize.Width) / (Parent.Width - 100)
     displaycontrol.Height += (textSize.Height * hf)
End If

'Position control in parent
displaycontrol.Left = (Parent.Width - displaycontrol.Width) / 2
displaycontrol.Top = (Parent.Height - displaycontrol.Height) - 50
Painting the Control
To produce the content, we need to handle the Paint event of the control that will display the message which is the displaycontrol object. In this part, we will draw the glow effects, the message itself, then modify its transparency.
First, we need to paint the components in a Bitmap object. We should also create a Graphics from the image object we just created.
'This BITMAP object will hold the appearance of the notification dialog.
'Why paint in bitmap? because we will set its opacity and paint it on the control later with a specified alpha.
Dim img As New Bitmap(displaycontrol.Width, displaycontrol.Height)
Dim e As Graphics = Graphics.FromImage(img)
'Set smoothing.
e.SmoothingMode = SmoothingMode.AntiAlias
After that, prepare the objects needed for painting.
'Prepare drawing tools.
Dim bru As Brush = New SolidBrush(Color.FromArgb(50, GlowColor))
Dim pn As Pen = New Pen(bru, 6)
Dim gp As New GraphicsPath()

'Make connecting edges rounded.
pn.LineJoin = LineJoin.Round
We will use the GraphicsPath and Pen for drawing the glow borders and the text area. Setting the Pen's LineJoin to LineJoin.Round, it will make the edges look rounded.
In this part, the borders are rendered, applying a glow effect:
'Draw borders
'Outmost, 50 alpha
gp.AddRectangle(New Rectangle(3, 3, displaycontrol.Width - 10, displaycontrol.Height - 10))
e.DrawPath(pn, gp)
'level 3, A bit solid
gp.Reset()
gp.AddRectangle(New Rectangle(5, 5, displaycontrol.Width - 14, displaycontrol.Height - 14))
e.DrawPath(pn, gp)
'level 2, a bit more solid
gp.Reset()
gp.AddRectangle(New Rectangle(7, 7, displaycontrol.Width - 18, displaycontrol.Height - 18))
e.DrawPath(pn, gp)
'level 1, more solidness
gp.Reset()
gp.AddRectangle(New Rectangle(9, 9, displaycontrol.Width - 22, displaycontrol.Height - 22))
e.DrawPath(pn, gp)
If you will notice when we created the graphics objects, we declared bru with our selected Color with an alpha value of 50. When we render the borders, we layered several alpha 50 rectangles to produce a "glowing" effect. I recommend you to read this article for similar logic.
Next, we create the black area in the inner part of the notification window where we will write the text.
'Draw Content Rectangle.
gp.Reset()
bru = New SolidBrush(Color.FromArgb(7, 7, 7))
pn = New Pen(bru, 5)
pn.LineJoin = LineJoin.Round
gp.AddRectangle(New Rectangle(8, 8, displaycontrol.Width - 20, displaycontrol.Height - 20))
e.DrawPath(pn, gp)
e.FillRectangle(bru, New Rectangle(9, 9, displaycontrol.Width - 21, displaycontrol.Height - 21))
We need to draw the rectangle first using the pen to get a rounded edge, then fill the empty sections.
We rendered all of these in a Bitmap object. Next, to achieve a transparency effect, we need to create an ImageAttributes and set its ColorMatrix before painting the rendered bitmap on the control itself.
'Set COLORMATRIX (RGBAw).
'Matrix [3,3] will be the Alpha. Alpha is in float, 0(transparent) - 1(opaque).
Dim cma As New ColorMatrix()
cma.Matrix33 = alphaval
Dim imga As New ImageAttributes()
imga.SetColorMatrix(cma)
We can set alpha value (0 - 1) of the image at the [3,3] of the ColorMatrix. For further idea on how to implement Alpha blending in .NET, this might help you.
Draw the message.
'Draw the notification message..
Dim sf As New StringFormat()
sf.Alignment = StringAlignment.Center
sf.LineAlignment = StringAlignment.Center
e.DrawString(msg, prnt.Font, New SolidBrush(Color.FromArgb(247, 247, 247)), New Rectangle(9, 9, displaycontrol.Width - 21, displaycontrol.Height - 21), sf)
Finally, draw the image onto displaycontrol.
'Now, draw the content on the control.
pe.Graphics.DrawImage(img, New Rectangle(0, 0, displaycontrol.Width, displaycontrol.Height), 0, 0, img.Width, img.Height, GraphicsUnit.Pixel, imga)
And don't forget to dispose the objects we used.
'Free the memory.
cma = Nothing
sf.Dispose()
imga.Dispose()
e.Dispose()
img.Dispose()
bru.Dispose()
pn.Dispose()
gp.Dispose()
The Animation - Fade In/Out
For the fade in/out or opacity effects, we use Timer object. For each ticks, the Timer increments/decrements the alphaval (if you will notice earlier, ColorMatrix matrix 3,3 is equal to alphaval) variable with the value of incr then refreshes the displaycontrol to repaint it.
For the fade in, once the notification window is fully opaque, it triggers tmrDelay for the hide delay of the notification. Then when tmrDelay ticks, it disables itself then runs again tmrAnimation for the fade out animation.
The two timers' events:
'Handles the window animation.
Private Sub tmr_tick(ByVal sender As Object, ByVal e As EventArgs) Handles tmrAnimation.Tick
        If (incr > 0) Then
            If (alphaval < 1) Then
                If (alphaval + incr <= 1) Then
                    alphaval += incr
                    displaycontrol.Refresh()
                Else
                    alphaval = 1
                    displaycontrol.Refresh()
                    tmrAnimation.Enabled = False
                    tmrDelay.Enabled = True
                End If
            End If
        Else
            If (alphaval > 0) Then
                If (alphaval + incr >= 0) Then
                    alphaval += incr
                    displaycontrol.Refresh()
                Else
                    alphaval = 0
                    tmrAnimation.Enabled = False
                    tmrAnimation.Dispose()
                    tmrDelay.Dispose()
                    displaycontrol.Dispose()
                    incr = 0.1
                    isVisible = False
                End If
            End If
        End If
End Sub
'handles the delay.
Private Sub tmrDelay_tick(ByVal sender As Object, ByVal e As EventArgs) Handles tmrDelay.Tick
        incr = -0.1
        tmrAnimation.Enabled = True
        tmrDelay.Enabled = False
End Sub
Using the Code
Since the component is a module, simply call the module name and the function:
NotificationManager.Show(<parent name>, <string/prompt>, <Color value>, <delay in milliseconds>)
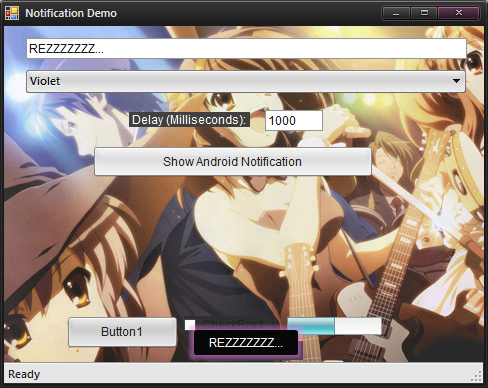
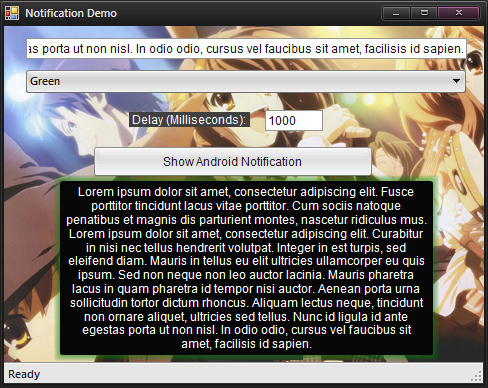
More sample screenshots:
Points of Interest
Creating your own controls is quite fun, especially if you need to make your application look nice. The .NET framework is quite powerful for creating user-painted components but not that great when doing animations.