I had a problem where I needed to input an entity's code into a field through a popup list that displays the entities' names. For example, if I selected "John Doe" from the popup, the input should display "001".
However, using the autocomplete property or combo-box control will only return the selected values displayed on the popup or constrain the input.
Due to this limitation, I needed to create a custom drop-down component to meet the requirements.
Popup behavior summary
A popup is typically a borderless window that floats above all other elements, which provides expanded actions or options to the user. It closes when the user clicks outside the popup or when the interaction is done.
Although a separate window, it does not steal the focus from the parent window.
The ToolStripDropDown class
Using the Form class won't simply work as a popup window without doing a low-level configuration.
Luckily, there is the ToolStripDropDown class that we can use that already handles all the popup behaviors, a base class that the toolbar drop-down components use.
Using the ToolStripDropDown class
Here is the simplest way we can use this class:
ToolStripDropDown popup = new ToolStripDropDown();// remove the whitespaces aroundpopup.Margin = Padding.Empty;popup.Padding = Padding.Empty;// we put our dropdown elements in a host containerToolStripControlHost host = new ToolStripControlHost(content);// remove the whitespaces aroundhost.Margin = Padding.Empty;host.Padding = Padding.Empty;// we add the host container to the popup elementpopup.Items.Add(host);// display the popup in the desired parent and locationpopup.Show(parentForm, location);We can simplify this further by creating a class that extends the ToolStripDropDown class.
using System.Windows.Forms;class DropDown : ToolStripDropDown{ public DropDown(Control content) { Margin = Padding.Empty; Padding = Padding.Empty; ToolStripControlHost host = new ToolStripControlHost(content); host.Margin = Padding.Empty; host.Padding = Padding.Empty; Items.Add(host); }}To use it, we can do the following:
Button btn = new Button() { Text = "Popup button", Width = 230 };new DropDown(btn).Show(this, new Point(textBox1.Left, textBox1.Top + textBox1.Height));
Creating the custom drop-down list
Let's extend a UserControl for the custom drop-down list. Then, we'll apply it to the active DataGridView textbox cell through its EditingControlShowing event.
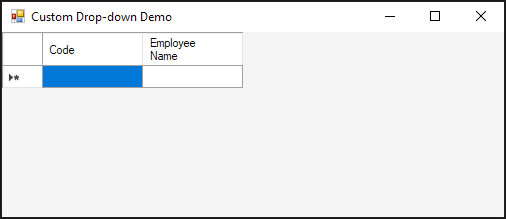
The custom drop-down should appear whenever the user edits the cells under the "Code" column.
Here's our main form layout:
Create a simple class that will hold the menu item data. Let's name it EmployeePickerItem.
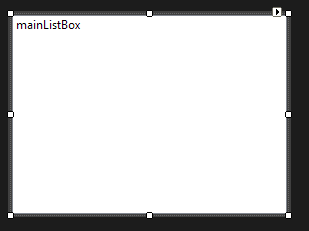
class EmployeePickerItem{ public string Code { get; set; } public string Name { get; set; }}Then add a UserControl named EmployeePicker. Add a ListBox control that fills the UserControl.
The EmployeePicker will have two properties:
// the textbox where we will set the selected item toTextBox TargetTextBox { get; set; }// we typecast the control's parent as ToolStripDropDownprivate ToolStripDropDown Popup{ get { return (Parent is ToolStripDropDown popup) ? popup : null; }}On the EmployeePicker constructor, we need to fetch the display data from the data source. For this sample, we will only use a List of dummy data:
public EmployeePicker(TextBox input){ InitializeComponent(); // dummy data List<EmployeePickerItem> options = new List<EmployeePickerItem>() { new EmployeePickerItem() {Code = "001", Name = "John Doe"}, new EmployeePickerItem() {Code = "002", Name = "Jane Doe"}, new EmployeePickerItem() {Code = "003", Name = "Steve Jobs"}, new EmployeePickerItem() {Code = "004", Name = "Bill Gates"}, new EmployeePickerItem() {Code = "005", Name = "Jeff Bezos"}, new EmployeePickerItem() {Code = "006", Name = "Mark Twain"}, new EmployeePickerItem() {Code = "007", Name = "Yoh Asakura"}, new EmployeePickerItem() {Code = "008", Name = "Ruby Rose"}, new EmployeePickerItem() {Code = "009", Name = "Rintarou Okabe"}, new EmployeePickerItem() {Code = "010", Name = "Kurisu Makise"}, new EmployeePickerItem() {Code = "011", Name = "Weiss Schnee"}, new EmployeePickerItem() {Code = "012", Name = "Nokz LeBron"}, }; // set the dummy data list as the listbox's data source mainListBox.DataSource = new BindingList<EmployeePickerItem>(options); // display the Name property and Code as the value mainListBox.DisplayMember = "Name"; mainListBox.ValueMember = "Code"; // set the textbox from the constructor argument as the target textbox TargetTextBox = input;}When we DoubleClick or press Enter an active item on the listbox, we set the value of the TargetTextBox:
private void MainListBox_DoubleClick(object sender, EventArgs e){ TargetTextBox.Text = mainListBox.SelectedValue.ToString(); Close();}private void MainListBox_KeyDown(object sender, KeyEventArgs e){ if (e.KeyCode != Keys.Enter) { return; } TargetTextBox.Text = mainListBox.SelectedValue.ToString(); Close();}Finally, we close the popup when the the value is selected.
private void Close(){ Popup.Close(); Dispose();}Displaying it on DataGridView cell edit
On the main form, handle the EditingControlShowing event with the following codes:
private void MainDataGridView_EditingControlShowing(object sender, DataGridViewEditingControlShowingEventArgs e){ // show only on "Code" column cells if (dataGridViewDemo.CurrentCell.ColumnIndex != dataGridViewDemo.Columns["dgvColCode"].Index) { return; } DataGridViewTextBoxEditingControl textBox = e.Control as DataGridViewTextBoxEditingControl; Rectangle cellRect = dataGridViewDemo.GetCellDisplayRectangle(dataGridViewDemo.CurrentCell.ColumnIndex, dataGridViewDemo.CurrentCell.RowIndex, true); // cell should be a textbox if (textBox == null) { return; } // display the popup below the cell EmployeePicker popup = new EmployeePicker(textBox); new DropDown(popup).Show((Control)sender, new Point(cellRect.Left, cellRect.Top + cellRect.Height)); popup.Focus();}Testing the popup
When we run the program, it should work like this:
Conclusion
By using the UserControl for our custom popup, we can use the form designer to conveniently do the layout and add the necessary features. Creating a custom popup component is not that difficult, thanks to the built-in ToolStripDropDown class.
I will update this article to discuss any issues that I might encounter with this approach.
You can download the sample solution (Visual Studio 2019) on my GitHub repo.